


Target Identification
Target Identification Number
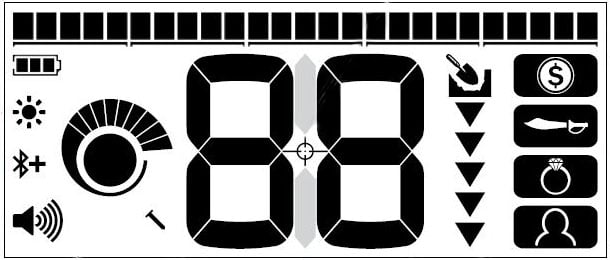
Target Identification (Target ID) numbers range from –9 to 40 with ferrous (iron) targets ranging from –9 to 0. When a target is detected, it is represented as a number that appears on the Target Identification Number field on the display. This indicates the target’s ferrous or non-ferrous properties for quick and easy identification. For example, a US quarter has a Target ID of 29. This means that each time a Target with an ID of 29 is detected, there is a good chance that it will be a US quarter. A Target ID number appears when a target is detected. This example shows the detection of a shallow US quarter. The corresponding Target ID Segment flashes upon detection (shown in grey). The last detected Target ID remains on the display for five seconds or until another target is detected. If there is no detection or the detector passes over a target that it rejects, the display shows two large dashes.
  Two large dashes on the Target Identification Number field when there is no detection.
Discrimination Segments
Discrimination Segments are located along the top of the LCD. They display Target IDs grouped into zones. Each Target Identification Number has a corresponding Discrimination Segment that will flash when a target with that ID is detected. Discrimination Segments are turned on (accepted) or off (rejected) to create Discrimination Patterns.Accept / Reject
Reject a Detected Target
- When an accepted Target ID is detected, there is a target response, and a Target ID Number is displayed.
- While the number is still displayed, press the Accept/Reject button to reject the detected target. Targets with the Target ID range represented by the corresponding discrimination segment will no longer give a response.
 The Accept/Reject button
 - Each time the detector is powered On, the Discrimination Pattern is returned to the default pattern (except for the Custom Search Mode). To avoid losing your changes, use the Store function to save your settings to the Custom Mode.
Discrimination Patterns
Discrimination Segments can be turned on or off to either detect or ignore targets. All segments that are on will be heard (accepted), and all segments that are off will not be heard (rejected). The combinations of accepted and rejected segments are called Discrimination Patterns. An example Discrimination Pattern showing Accepted segments and Rejected segments.
Discrimination Pattern Edit
You can create your own Discrimination Patterns to detect or ignore specific target types, so you can dig more treasure and less trash. The preset Discrimination Patterns for each Search Mode can be edited. Note that changes to the Coin, Relic, and Jewellery Modes will return to their preset Discrimination Patterns each time the detector is powered on. To avoid losing your changes, use the Store function to save your settings to the Custom Mode.- In any Search Mode, press the Accept/Reject button whilst not detecting a target (i.e. no Target ID Number is displayed). The Accept/Reject button
- 'Ed’ will appear on the Target ID Number field to indicate that the Discrimination Pattern is being edited.
 'Ed' on the Target ID Number field.
 - Use the Discrimination Pattern Edit arrow buttons to navigate to the segment you wish to adjust. Selected segments flash.
 The Discrimination Pattern Edit buttons (Left/Right arrows)
 - Press the Accept/Reject button to toggle the selected segment on or off.
- Repeat steps 3 and 4 until you have created your Discrimination Pattern.
- The Edit screen will time out after 3 seconds of inactivity.
Store a Custom Search Mode
Any Search Mode (Coin, Relic, or Jewellery), can be stored in the Custom Search Mode slot. The current detector settings and discrimination pattern will be saved for quick access. The unique target separation and depth characteristics of the Search Modes are also saved when the Custom Search Mode is stored.- Select and Edit the Search Mode you wish to save.
- Long-press the Search Mode button (5 seconds). ‘St’ will appear on the Target ID Number display, and there will be a confirmation tone.
 ‘St’ appears on the Target ID Number Display. The Custom Search Mode icon and the source Mode icon flash twice.
 - The newly stored Custom Search Mode will now be active and can be edited at any time.
All-Metal
The All‑Metal function turns on all of the Discrimination Segments so that all metal targets will be detected, including iron.Enable All‑Metal
- Press the All‑Metal button to enable All‑Metal.
 The All‑Metal button
 - All of the Discrimination Segments will turn on and all metal objects will be detected.
- To disable All‑Metal, press the All‑Metal button again. The Discrimination Pattern will return to its last-used state.
Using All‑Metal to Check a Target
All‑Metal can be used to check a non-ferrous detection to see if it also contains ferrous material. If the target gives a mixed response (both non-ferrous and ferrous) once All‑Metal is enabled, then there is a chance that the target is a large iron object or a crown bottle cap. If there is a repeatable non-ferrous response, then the target does not contain iron. This means that the target is more likely to be a good (non-ferrous) target.Creating Your Own Discrimination Pattern
Obtain some desirable targets (e.g. coins in your local currency) and wave each one over the detector coil at a range of heights. The Target ID for each target will be displayed. Note, you may need to enable All‑Metal to make sure your target isn’t discriminated during this process. Discrimination patterns (including the Search Mode preset patterns) typically ignore ferrous targets, since these are most often trash. It is worth noting that some countries have ferrous coins, so it’s a good idea to check the Target IDs of the coins you want to find so that they aren’t accidentally masked. You can keep a list of the Target ID numbers and use it to create a discrimination pattern that specifically accepts (detects) those Target IDs for a more productive detecting session.Target Tone
Groups of Target IDs are assigned Target Tones of different pitch so that the operator can broadly classify the Target ID without having to look at the display. VANQUISH 440 has three Target Tones: Low, Mid, and High. VANQUISH 540 has five Target Tones: T1 to T5. The tone break position is the point on the discrimination scale at which the Target Tone changes from one pitch to another. Note that the exact tone break positions vary slightly for each Search Mode. VANQUISH 440 tone break positions (approximate).
  VANQUISH 540 tone break positions (approximate).