
You must work in a completely clean environment, free of dust and hair to ensure the waterproof function of this remote control. You will need the following:
 Lift the bottom cover slightly ONLY at the ends (± 3mm by levering between the rubber and the cover with a flat screwdriver for example)
 Once inserted, lift the cover slightly (± 3mm by levering between the rubber and the cover with a flat screwdriver for example). REMEMBER ONLY at the end of the cover. Then push in fully again. This ensures that the seal is properly in its housing (not pinched).
 Congratulations, the remote control is ready to use.
- 1 small flat screwdriver
- 1 Dynamometric screwdriver + Torx 6 adaptor (Eg: model example: WERA 05074700001 7440)
- 1 small brush
- 1 tissue in case you need to clean the screen
- some silicone grease (Eg. Molykote 55 O-Ring Grease)
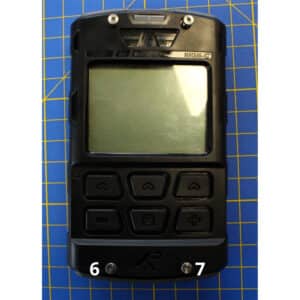
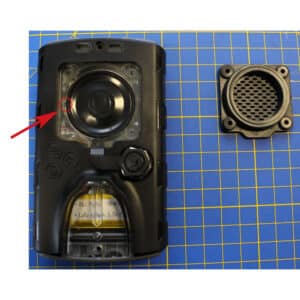
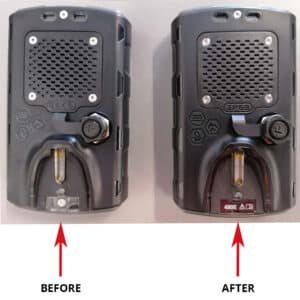
Back of the Remote Control
Step 1
Using a hair dryer or heat gun (carefully) apply gentle heat to the serial number label to soften the adhesive, using a craft knife gently lift a corner & peel off the sticker onto the blade, and place it somewhere safe for re-application.
Step 2
- On the bottom unscrew screw #5. Keep it apart from other screws, this one is different.
- On the top unscrew the 4 screws from the speaker grill - #1 first, then #3, then #2 and finish with #4, paying attention to the seal behind.
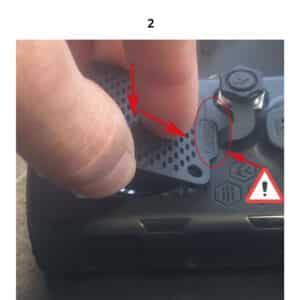
Step 3
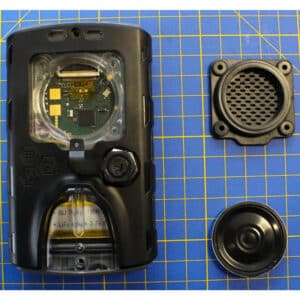
- Remove the speaker grill from the remote control. Pay attention to keep the rubber link in its housing and tilt the speaker grill there. (This avoids deforming the seal)
- You can use a flat screwdriver to help you to remove the speaker grill, inserting the screwdriver slightly in position #1
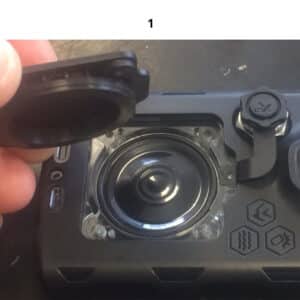
Step 4
- Turn the remote control over on the table. The speaker will fall out
- With the TORX 6 screwdriver, remove the two screws on the bottom, #6 and #7
Step 5
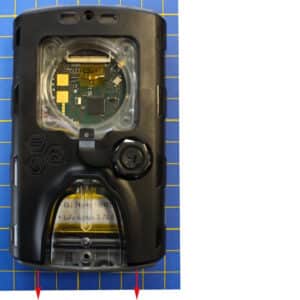
Remove Ds-RC1-BOTTOM symmetrically from the D2-RC1-MAIN Lift the bottom cover slightly ONLY at the ends (± 3mm by levering between the rubber and the cover with a flat screwdriver for example)
Step 6
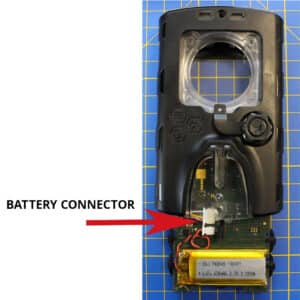
- Slide down half of the PCB from the main body
- Disconnect the battery connector from the PCB
- Wait 10 minutes
Step 7
- Align the connector socket to the PCB and connect (DO NOT insert the connector askew - It will result in a bad contact issue, charge issue, etc.)
- Insert the PCB inside the main body, making sure the screen is clean with no silicone grease on it
- Check that the connector cables do not cover the speaker contacts
Step 8
- Grease the D2-RC1-BOTTOM O-ring, with a brush and some silicone grease
- Check the O-ring doesn't have any dust or hair, or brush hair
Step 9
- Insert D2-RC1-BOTTOM symmetrically to the D2-RC1-MAIN
Once inserted, lift the cover slightly (± 3mm by levering between the rubber and the cover with a flat screwdriver for example). REMEMBER ONLY at the end of the cover. Then push in fully again. This ensures that the seal is properly in its housing (not pinched).
Step 10
- Put the speaker inside the main body. Take care to place the speaker in the right position. Match slot from the body and black pin from the speaker (at << nine o'clock >>)
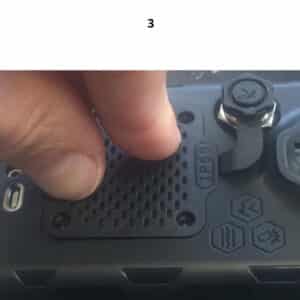
Step 11
- Assemble the speaker grill and seal to the D2-RC1-MAIN body. Pay attention to keep the rubber link in its housing and put the flat hood there. (This avoids deforming the seal)
Step 12
- Clamp all the screws with the TORX 6x3.5 dynamometric screwdriver (Torque= 0,30Nm 0,30Nm) except the unique screw (#5) which needs to be manually screwed at the end of the process
- Note that for the speaker grill, you need to clamp the screw #1 first, then the #3 , then #2 and finish with #4
Step 13
- Re-attach the serial number label
Congratulations, the remote control is ready to use.
